
One of the most common deficiencies on a Home Inspection Report is a poorly sealed and insulated attic hatch. You’re probably thinking, why should I care about my attic hatch? A home loses about 25% of its heat through the top floor ceiling due to the effect of hot air rising. The attic hatch is a very large opening in that ceiling which accelerates this effect by allowing that rising air to escape the home. If you’re lucky this only causes heat loss in the winter and brings attic heat into the home in the summer. If your unluckily the humid air escaping will condense in the cold attic causing mold and even structural rot.
To stop your attic hatch from draining your savings, try these easy steps to seal in the air and protect your attic. This easy DIY home improvement project costs under $75 dollars, takes only a few hours, and could save you thousands over the life of your home. Sounds like a great investment to me.
For the purpose of this process I am assuming you have an uninsulated plywood attic hatch.
You will need:
- 2″ thick Polystyrene Rigid Insulation
- Attic Hatch Weatherstripping
- Foam Compatible Glue
- Caulking
- Four Hook & Eye Latches or Draw Catches
- Knife
- Straight Edge
- Measuring Tape
Insulate The Hatch
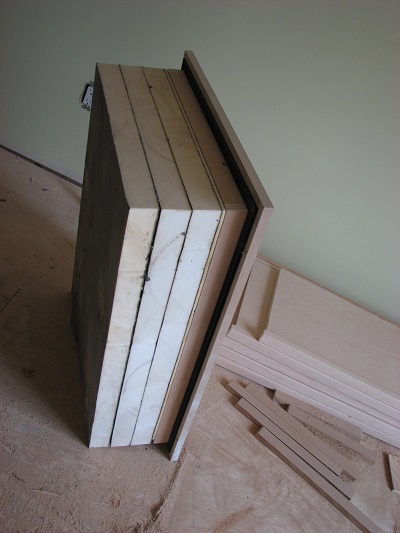
Remove your existing attic hatch and measure its size. Cut four pieces of Polystyrene Rigid Insulation about 1/2 inch smaller than the dimensions of the hatch. The insulation will both slow heat loss and add ballast to the hatch to improve the seal at the weatherstripping. Use the foam compatible glue to fasten the insulation to the back of the hatch.
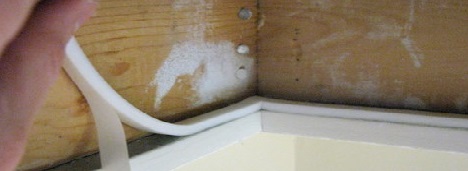
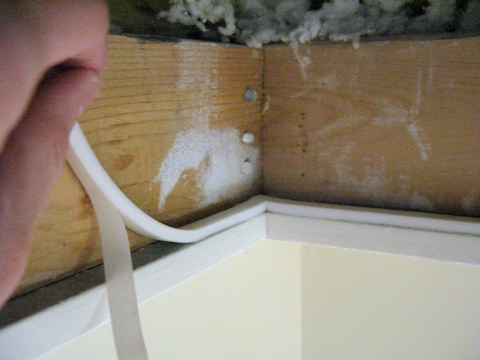
Air Sealing The Hatch Opening
The hatch typically sits on wood trim lip that extends past the opening. If there is existing weatherstripping on this lip remove it with a putty knife. Install the new weatherstripping along this lip making sure there are no gaps. Apply caulking along the trim/ceiling joint on the inside to prevent air from leaking. Each hatch design is unique and you will need to determine the best way to seal the trim.
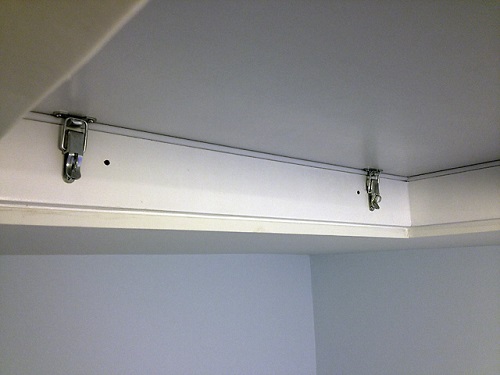
Installing Latches and Handles (Optional)
Fasten two handles to the inside of the hatch to assist in pulling it down against the weatherstripping. Install four latches on opposing sides of the hatch and trim so that when you pull down on the hatch they secure it against the compressed gasket.

[…] Air leaks at windows and doors are most noticeable during the winter. Weather stripping is inexpensive and will both increase your comfort, while decreasing your heating costs. Also take a close look at your attic hatch insulation and weather-stripping. To improve your hatch please follow our directions on Sealing & Insulating Your Attic Hatch. […]